Table of Contents
Before launching the simulation, it is initially necessary to create the starting *.cth file. It will contain a fresh cloth with the desired dimensions, normalized distances between points and strength coefficient of the springs connecting the points.
The *.cth format was defined in such manner that it is able to be read and written using the POV-Ray™'s input/output files directives (#fopen, #read, #write, #fclose). One thus will write the following macro:
#macro WriteClothFile(filename, n1, n2, nlng, ks, ht)
  #debug "\nWriting new cth file\n"
  #fopen file filename write
  #write(file, n1, ", ", n2, ", ", nlng, ", ", ks, ",\n";)
  #local l1 = nlng*(n1-1);
  #local l2 = nlng*(n2-1);
  #local st = seed(1234);
  #local i=0;
  #while (i < n1)
    #local j=0;
    #while (j < n2)
      #local tempx = -l1/2 + i*nlng;
      #local tempz = -l2/2 + j*nlng;
      #local tempy = ht + (-1+2*rand(st))*nlng*0.1;
      #write(file, tempx, ",", tempy, ",", tempz, ", 0.0, 0.0, 0.0,\n")
      #set j=j+1;
    #end
    #set i=i+1;
  #end
  #fclose file
#end
After having opened the file (#fopen), the macro writes the first line (#write) which contains the number of points of the cloth patch in two dimensions (n1, n2), the normal distance between all points (nlng), and the strength coefficient of the springs (ks).
Then, the various points are distributed in a rectangle of dimension (nlng*(n1-1)) on (nlng*(n2-1)), parallel with the (xz) plane, and at height ht, centered around y axis. A small amount of noise is added to each point coordinates (rand()). Don't forget to close the file (#fclose)...
So we will define a simple table:
#declare Table =
  union {
    cylinder { 8*y, 9*y, 8 }
    torus { 8, 05 sturm translate 85*y }
    cylinder { 85*y, 0, 05 }
    cylinder { 0, 05*y, 4 }
  }
To check that the simulation does not begin with part of the fabric IN the table, we can create the mesh Nappe, using 0 iterations in simcloth:
WriteClothFile("nappe.cth", 50, 50, 1.8/50, 10, 0.95)
simcloth {
iterations 0
input "nappe.cth"
mesh_output "nappe.msh"
uv_mesh on
}
#declare Nappe =
mesh {
#include "nappe.msh"
uv_mapping
texture {
pigment {
checker color rgb <1, 0.5, 0.2> color rgb <1, 0.8, 0.4>
scale <1/10, 1/10, 1/10>
}
}
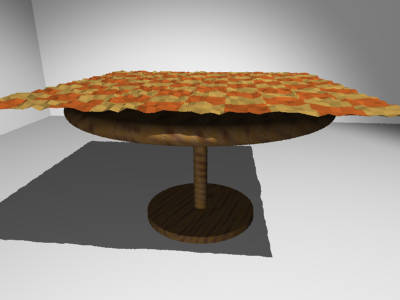
}Then, the ground, the walls, a light source, a camera, are added, and we obtain this:
And for that, nothing better than the gravity (-0.4*y). Moreover, the table is rough (and the fabric also), one thus will put the coefficient of friction at 0 (high frictions). As the distance between each point is rather small, one will also take a rather small time interval between each iteration (0.03).
simcloth {
  environment Table
  friction 0
  gravity -0.4*y,
  damping 0.9,
  intervals 0.03
  iterations 50
  input "nappe.cth"
  output "nappe.cth"
  mesh_output "nappe.msh"
  smooth_mesh on
  uv_mesh on
}
Don't forget to look at the messages window (in Windows & Mac version) or output stream (in UNIX version), to know if the simulation ended OK or not (in case of problems while opening files, lack of memory, etc...).
The starting *.cth file can be calculated only once. By putting the WriteClothFile(...) macro in comments thereafter - or make it conditional for clock off: #if(clock_on=off) macro #end - , each simulation will begin again where the preceding one was stopped.
In order to avoid coincident surfaces, you can reduce very slightly the dimensions of the table, and level up the tablecloth a little...
object { Nappe translate 0.001*y }
object {
  Table scale <0.98, 1, 0.98>
  texture { T_Wood23 rotate <10, 20, 0> }
}
For those who are as I am (i.e. lazy), a complete script is available: nappe.pov
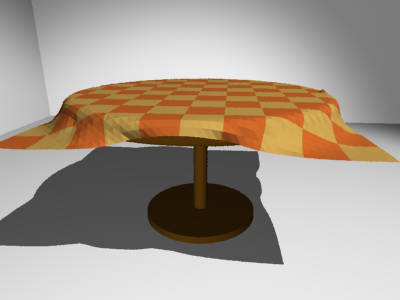
After 50 iterations ...

... 50 additional iterations ...
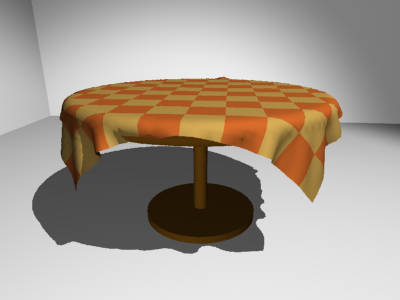
... and 100 more.
The difficulty in making a good-looking lying cloth is to well position the fabric at the beginning, and to make it so that it tends to gather in a smaller zone than its dimensions.
Once more, we will make it easy: a cube (with rounded edges), lying on the ground:
#declare R = 1;
#declare Cube =
  union {
    box { <R, 0, R>, <1-R, 1, 1-R> }
    box { <R, 0, 0>, <1-R, 1-R, 1> }
    box { <0, 0, R>, <1, 1-R, 1-R> }
    cylinder { <R, 0, R>,  <R, 1-R, R>, R }
    cylinder { <R, 0, 1-R>,  <R, 1-R, 1-R>, R }
    cylinder { <1-R, 0, R>,  <1-R, 1-R, R>, R }
    cylinder { <1-R, 0, 1-R>,  <1-R, 1-R, 1-R>, R }
    sphere { <R, 1-R, R>, R }
    sphere { <R, 1-R, 1-R>, R }
    sphere { <1-R, 1-R, R>, R }
    sphere { <1-R, 1-R, 1-R>, R }
    translate -0.02*x
  }

#declare Obstacle =
  union {
    plane { y, 0 }
    object { Cube }
  }
We will reuse the WriteClothFile(...) macro from the preceding example, and we will create a rectangular cloth patch (30 X 50 points):
WriteClothFile("drape.cth", 30, 50, 2/50, 20, 1.5)
simcloth {
  environment Obstacle
  friction 0
  gravity -.5*y
  damping 0.9
  intervals 0.03
  iterations 200
  input "drape.cth"
  mesh_output "drape.msh"
  smooth_mesh on
  uv_mesh on
}

#declare Drap =
  mesh {
    #include "drape.msh"
    uv_mapping
    texture {
      pigment {
        checker color rgb <1, 0.5, 0.2> color rgb <1, 0.8, 0.4>
        scale <1/10, 3/50, 1>
      }
    }
  }
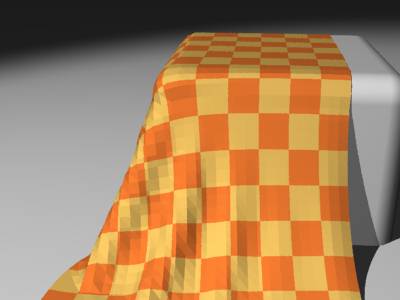
Well... hu... good, but it is not what is called pretty good-looking lying cloth (this one is rather banal...)
Let's modify the positioning of each point of the cloth, in the macro WriteClothFile(...), by carrying out a rotation of -60 degrees around axis Z, and slightly translating it towards the right, like this:
#local tempx = -l1/2 + i*nlng;
#local tempz = -l2/2 + j*nlng;
#local vtemp = ;
#local vtemp = vaxis_rotate(vtemp, z, -60);
#local tempy = ht + (-1+2*rand(st))*nlng*0.1;
#local vtemp = vtemp + tempy*y + .2*x;
#write(file, vtemp.x, ",", vtemp.y, ",", vtemp.z, ", 0.0, 0.0, 0.0,\n")
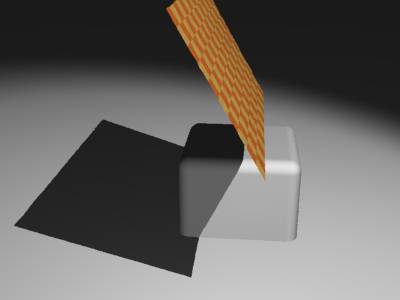
One does not forget "to level up" the cloth, and the starting position can be visualized:
And finally, let the nature... well, MegaPOV ... do its job:
For the lazy ones, there is a complete script: drape.pov
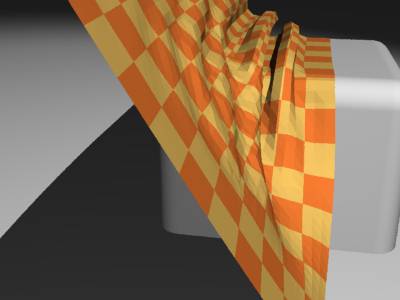
The fabric starts lying...

Some iterations further...
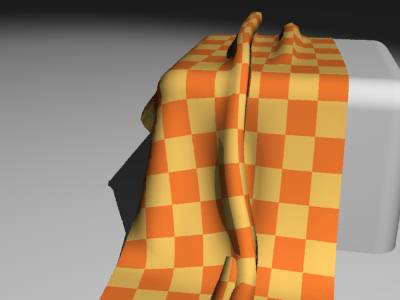
... and the result.
Obviously, the absence of internal test of collision (fabric against fabric) causes some "errors" (see in bottom of cloth)... . But, one can nevertheless obtain more or less satisfactory results.